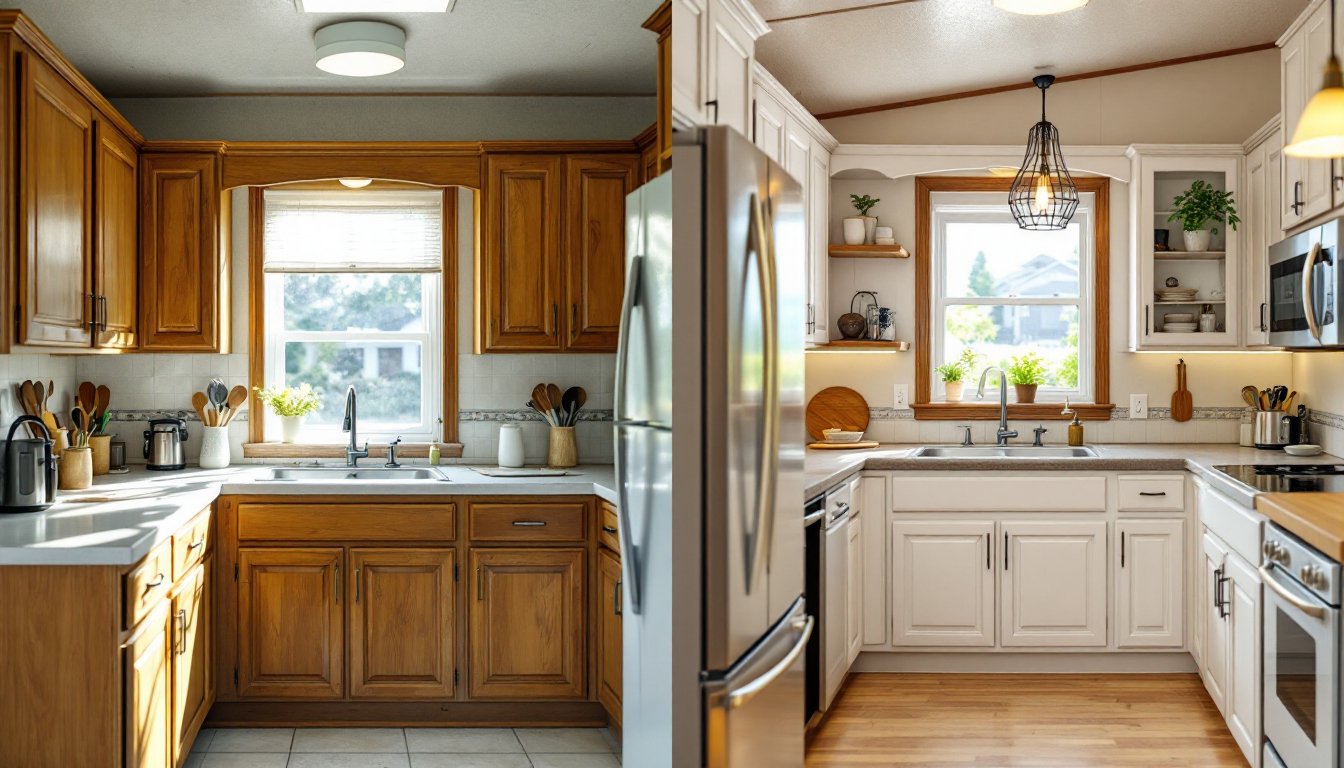
Mobile home kitchens often come with builder-grade cabinets that don’t reflect the homeowner’s style or stand up well to daily use. Over time, cabinet doors warp, finishes dull, and outdated hardware screams “1990s.” The good news? You don’t need a full gut renovation to transform your space. Whether you’re refreshing tired cabinetry with paint, upgrading hardware, or replacing units entirely, mobile home kitchen cabinet updates rank among the highest-impact improvements you can make. This guide walks you through real before-and-after transformations and the practical steps to choose the right solution for your budget and timeline.
Table of Contents
ToggleKey Takeaways
- Before and after mobile home kitchen cabinets transformations rank among the highest-impact home improvements, achievable through painting, refacing, or full replacement depending on budget and timeline.
- Cabinet painting is the most budget-friendly DIY option at $200–$500 in materials; proper prep work including sanding, degreasing, and priming is essential for paint adhesion and durability.
- Cabinet refacing costs 40–60% less than full replacement when cabinet boxes are structurally sound, making it the best middle-ground solution for most mobile homeowners.
- Stock or semi-custom cabinets ($2,000–$8,000) are more practical for mobile homes than custom options, as they’re engineered for standard installations with reliable quality control.
- Swapping hardware, adding under-cabinet LED lighting, and installing soft-close hinges deliver disproportionately high visual impact at minimal cost, transforming a kitchen’s style from dated to modern.
- Mobile home kitchens benefit from strategic lighting and organization improvements—such as under-cabinet strips and pull-out shelves—that maximize compact 80–150 sq. ft. spaces without requiring permits or extensive renovation.
Why Mobile Home Kitchen Cabinets Need Updating
Mobile home cabinets face unique challenges. They’re often built lighter and with lower-grade materials than site-built homes, thinner plywood, cheaper hinges, and finishes that aren’t as durable. Moisture from cooking and bathroom humidity can cause doors to swell or warp. Hardware loosens over time due to vibration from the road (even stationary units) and constant opening and closing.
Beyond durability, outdated cabinetry can drag down the entire kitchen’s appeal. Outdated finishes, mismatched hardware, and poor lighting make the space feel cramped and worn. A well-planned cabinet update doesn’t just improve function: it refreshes the whole room and increases home value when it comes time to sell. The beauty of mobile home kitchens is their size, you can make a dramatic impact with less material and labor than a full-size home renovation.
Budget-Friendly Cabinet Refacing Options
If your cabinet frames and structure are still solid, refacing is the most cost-effective route. This means replacing door fronts and drawer faces while keeping the box structure in place. You’re looking at 40–60% of full replacement costs, with results that look brand new.
Refacing works best when the existing cabinet boxes are square, level, and structurally sound. Check for soft spots, water damage, or significant warping before committing. If the boxes are beyond repair, full replacement is your only option.
Paint And Finish Upgrades
Painting cabinets yourself is the most budget-friendly option and delivers stunning results when done right. The key is prep work, you can’t skip it.
Materials needed:
- 120-grit and 220-grit sandpaper (for smoothing existing finish)
- TSP (trisodium phosphate) or similar degreaser
- Primer (bonding primer works best on glossy surfaces)
- Cabinet paint (semi-gloss or satin polyurethane-based: brands like Benjamin Moore Advance or Sherwin-Williams Pro Classic are industry standards)
- Brushes and foam rollers (for smooth, brush-mark-free finish)
- Drop cloths and painter’s tape
- Gloves, goggles, and a respirator mask
Basic steps:
- Remove all door fronts and drawer faces. Label them with painter’s tape so you can reinstall correctly.
- Clean everything with TSP solution to cut grease buildup, skipping this causes paint adhesion failure.
- Sand all surfaces with 120-grit, then 220-grit, to dull the existing finish and help primer stick.
- Apply bonding primer, wait for cure time per product instructions (usually 2–4 hours).
- Apply two coats of cabinet paint, sanding lightly between coats.
- Reinstall hardware and door fronts after paint fully cures (24–48 hours minimum).
Paint jobs on mobile home cabinets typically cost $200–$500 in materials if you’re doing 15–20 door and drawer faces. Professional painters charge $2,000–$4,000 for labor and materials combined. The DIY route requires patience and a well-ventilated space, open windows and use fans because the fumes are real.
Other refacing options include cabinet wraps (adhesive vinyl films that mimic wood grain or solid colors) or replacing door fronts only with pre-made units. Wraps are faster and cheaper but less durable than paint and won’t hide cabinet box damage. Pre-made door replacements from suppliers like Slab Door or CustomCore run $150–$300 per door and require careful measurement of your existing frame dimensions to ensure fit.
Full Cabinet Replacement: When And How
Replace cabinets when boxes are water-damaged, severely warped, or when you need a complete style overhaul. Mobile home kitchens typically have 15–25 linear feet of cabinet space, much smaller than standard homes, which actually makes full replacement more manageable.
Planning the replacement:
- Measure twice: Get exact height, width, and depth of existing cabinet runs. Note whether your home has a pitched roof that affects upper cabinet height.
- Check plumbing and electrical: Identify sink lines, drain locations, and any outlets that run through cabinet space. You may need permits for plumbing or electrical rerouting.
- Assess your mobile home’s age and construction: Older homes (pre-1980) may have non-standard wall framing or inconsistent floor levels. Get a helper when installing, cabinets are heavy and mobile home walls can’t handle being pushed hard.
Material options:
- Stock cabinets (Home Depot, Lowe’s, Menards): Pre-made units in standard sizes. Cost: $2,000–$5,000 for a full kitchen. Fastest installation (1–3 days).
- Semi-custom cabinets (Waypoint, Shaker, Dura Supreme): More style choices and slight customization. Cost: $4,000–$8,000. Better quality than stock.
- Custom cabinets (local cabinetmakers): Built to exact specs and materials of your choice. Cost: $6,000–$15,000+. Slowest timeline (4–8 weeks) but best fit and longevity.
For mobile homes, stock or semi-custom cabinets are the practical choice. They’re engineered for standard installations and quality control is reliable. Custom shops are worth considering only if you have unusual space constraints or want premium finishes.
Installation basics:
- Remove existing cabinets. Turn off water and power if they house plumbing or electrical. Locate studs in walls using a stud finder (critical for weight distribution).
- Install wall cabinets first, fastening through cabinet rails directly into studs using 2.5-inch lag bolts or cabinet screws. Mobile home walls are thinner (often 3.5–4 inches), so drill pilot holes to prevent splitting.
- Install base cabinets, ensuring they’re level (shim under feet as needed). Secure to floor and studs.
- Check all doors and drawers for smooth operation before finishing.
Many people hire professionals for full cabinet replacement, which costs an additional $800–$2,000 in labor. This is worth it if walls are out of square or plumbing/electrical work is involved.
Hardware And Accessory Swaps That Make A Difference
Changing cabinet hardware is the quickest, cheapest upgrade you can make, and the impact is disproportionately high. New knobs and pulls cost $3–$15 per piece, and swapping them out takes minutes per cabinet.
When selecting hardware, consider your mobile home’s style and the cabinet material. For painted cabinets, matte black or brushed nickel pulls give a contemporary feel. For stained wood, oil-rubbed bronze or cup handles suit traditional styles. Ensure the backset (distance from the cabinet door edge to the center hole) matches your existing holes to avoid drilling new ones.
Accessory upgrades beyond hardware include:
- Soft-close hinges and dampers: Replace traditional hinges with soft-close units ($20–$50 per hinge). Drawers and doors close slowly without slamming, a quality-of-life improvement and noise reducer.
- Pull-out shelves and baskets: Install in base cabinets to maximize storage and accessibility. Retrofit kits run $40–$100 per shelf.
- Interior lighting strips: Under-cabinet LED strips ($15–$50) brighten work surfaces without adding dedicated wiring (plug-in versions available).
- Toe-kick lighting: Low-profile LED strips under base cabinets add ambient light and modern visual appeal.
Developers and designers often focus on these small details, projects documenting cabinet makeovers on sites like Young House Love show how hardware swaps alone can shift a kitchen’s entire aesthetic from dated to current.
Lighting And Layout Improvements For Maximum Impact
Cabinets don’t exist in isolation, how you light and arrange them matters enormously. Mobile home kitchens are typically compact (often 80–150 sq. ft.), so smart lighting and organization can transform perceived space and functionality.
Under-cabinet lighting is the single best lighting investment. It removes shadows over countertops and makes the kitchen feel larger and more modern. LED strip lights plug into existing outlets and cost $20–$80 per run. They’re dimmable, energy-efficient, and install with adhesive tape or small clips, no hardwiring needed.
Pendant lights or track lighting above islands or peninsulas add task lighting and visual interest without requiring cabinet changes. If your kitchen lacks an island, a small cart with shelving can provide additional storage and visual separation while staying mobile-home friendly.
Organization and layout tweaks amplify the impact of refreshed cabinetry:
- Maximize vertical space: Install open shelving above upper cabinets if ceiling height allows (typical mobile homes are 7–8 feet).
- Create zones: Group cooking tools near the stove, dishware near the sink, and dry goods in a central pantry cabinet.
- Use cabinet interiors wisely: Adjustable shelves, dividers, and pull-out organizers turn wasted space into functional storage.
Many homeowners pair cabinet updates with minor layout shifts, moving the microwave to a shelf above the fridge or converting a lower cabinet into a beverage center. These don’t require permits and take a day or two to carry out, but they make daily kitchen life noticeably easier. Resources like The Kitchn offer deep dives into small-kitchen organization strategies that pair well with cabinet refreshes.
Conclusion
Mobile home kitchen cabinet updates don’t require a fortune or months of disruption. Start by assessing your cabinet condition, if frames are solid, paint or refacing gets you 80% of the way there for minimal cost. If replacement is necessary, stock or semi-custom cabinets deliver reliability without the custom price tag. Layer in hardware, lighting, and thoughtful organization, and you’ll have a kitchen that looks refreshed, functions better, and reflects your actual style instead of a builder’s budget constraints. The best transformation is the one you’ll actually complete, so choose the approach that fits your timeline, skill level, and wallet.