Setting up a true home theater isn’t as intimidating as it sounds. A 5.1 channel home theater system delivers cinema-quality sound right in your living room without requiring professional installation or months of planning. Whether you’re upgrading from a soundbar or building from scratch, understanding the basics of a 5.1 configuration puts you in control of the project. This guide walks through what you need, how to set it up, and where to place components for the best possible audio experience. By the end, you’ll know exactly what to buy and how to make it work in your space.
Table of Contents
ToggleKey Takeaways
- A 5.1 channel home theater system uses five speakers plus one subwoofer to deliver immersive cinema-quality sound without professional installation or extensive planning.
- The center channel speaker is critical for dialogue clarity and should be positioned at ear level, either above or below your TV, while left and right speakers should sit equidistant from the center listening position to create balanced stereo imaging.
- An AV receiver rated for at least 100 watts per channel at 5.1 channels is essential; budget models ($300–$500) perform well for most homes and should include Dolby Digital and DTS decoding.
- Subwoofer placement significantly impacts bass quality—testing it in different positions before permanent installation can reveal whether your room requires corner, wall, or mid-floor placement for tight, controlled sound.
- A 5.1 system works best in rooms between 150 and 300 square feet; soft furnishings like drapes, carpets, and rugs help absorb reflections that would otherwise muddy the sound quality.
- Temporary speaker setup and test listening for a week before permanent installation ensures you avoid costly mistakes and find optimal placement for your specific room layout and furniture arrangement.
What Is A 5.1 Channel Home Theater System?
A 5.1 channel system means five speakers plus one subwoofer. The numbers break down like this: the “5” covers your front-left, center, and front-right channels, plus two surround speakers positioned to the sides or slightly behind the listening area. The “.1” is the subwoofer, which handles low frequencies below 100 Hz, the rumble you feel during explosions, earthquakes, or heavy bass in music.
Why this configuration works: the center channel handles most dialogue, keeping voices locked to the screen regardless of where you sit. The left and right channels deliver music and sound effects. The surrounds pull you into the action by placing ambient noise, footsteps, and directional effects around the room. The subwoofer adds impact and depth without taking up much visual space.
This setup significantly outperforms a single soundbar or stereo speakers because it uses directional audio to create a 3D soundscape. You’re not just hearing a movie, you’re immersed in it. A 5.1 system is also more affordable and practical than larger 7.1 or Atmos setups, making it ideal for bedrooms, basements, or living rooms under 250 square feet.
Key Components You’ll Need
Amplifier and Receiver
Your AV receiver is the command center. It decodes audio signals, amplifies them, and routes them to each speaker. Look for a receiver rated for at least 100 watts per channel at 5.1 channels: this ensures clean, dynamic sound without strain at typical listening volumes.
Key features to prioritize: Dolby Digital and DTS decoding (standard on all modern receivers), multiple HDMI inputs (at least 4), and a built-in amplifier powerful enough for your speaker size. Many receivers also include calibration microphones that automatically adjust speaker distance and level, saving you hours of manual tweaking.
Budget receivers ($300–$500) handle the job perfectly for most homes. Mid-range models ($500–$1,000) add more features and cleaner amplification. Don’t overspend on specs you won’t use: a straightforward, well-reviewed receiver beats an over-featured model you can’t operate.
Speakers and Subwoofer
Your speakers should match in tonal character, ideally buy a package or speakers from the same manufacturer. Passive speakers (the standard type) rely on the receiver’s amplifier and cost less upfront. Each speaker plays a specific role:
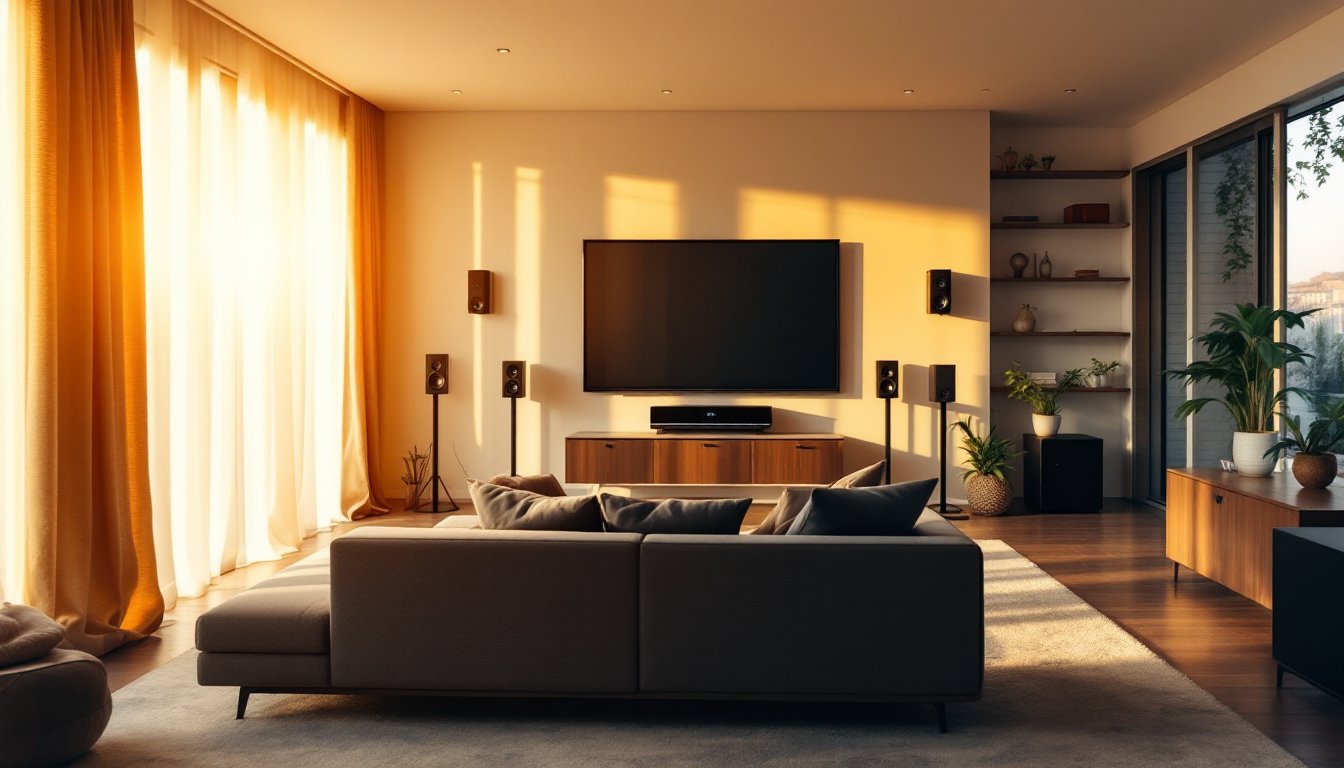
Center channel: Mount this above or below your TV. It’s the most important speaker for dialogue clarity. A 2-way center (tweeter and woofer) works for most rooms: a 3-way center (tweeter, midrange, woofer) offers slightly more detail but takes more space.
Left and right front speakers: Position these at ear level, angled slightly inward, about 8–12 feet apart. Bookshelf speakers ($150–$300 per pair) work well for small-to-medium rooms. Floor-standing towers ($300–$600 per pair) are larger but don’t require stands and often include more drivers for richer sound.
Surrounds: These can be smaller than your front speakers. Wall-mounted surrounds ($150–$250 per pair) keep sight lines clear and install flush against the wall. Dipole or bipole surrounds, which radiate sound sideways rather than directly at listeners, are less directional, a good choice if seats aren’t perfectly positioned.
Subwoofer: This does the heavy lifting below 100 Hz. A 10–12 inch driver suits rooms under 300 square feet: larger rooms benefit from 12–15 inch drivers. Quality subs ($300–$800) have adjustable crossover settings, which let the receiver know at what frequency to hand off low-frequency duty to the sub. Avoid cheap subs, uneven bass or excessive booming ruins the experience. Reputable brands deliver tight, controlled bass that complements the whole system.
Setting Up Your 5.1 System at Home
Installation isn’t hard if you follow a logical sequence. Start by positioning all speakers before running cables.
Step 1: Map your listening area. The sweet spot, where stereo imaging and surround envelopment work best, is roughly in the middle of the room, slightly forward of center. Measure distances from this spot to where each speaker will sit. Write these down: you’ll enter them into your receiver’s setup menu later.
Step 2: Mount the center channel. Position it at ear level when seated (typically 3–4 feet high). If mounting above the TV, angle it down slightly toward ears. Use sturdy wall brackets rated for the speaker’s weight. Check that it doesn’t vibrate or rattle when sound plays, a loose speaker ruins dialogue clarity.
Step 3: Position left and right speakers. These should sit at ear level or slightly above, about 30 degrees out from the center listening position. Keep them equidistant from the center: uneven distances create an off-center sound image. Leave 1–2 feet of space from walls to reduce reflections that muddy sound.
Step 4: Place surround speakers. Mount these 2–3 feet above ear level on side or rear walls, roughly 90–110 degrees from the center listening position (directly to the sides or slightly behind). This height placement keeps ambient sounds from pulling your attention up toward the ceiling. Keep them farther from the listening area than your front speakers, distance makes them feel spacious rather than aggressive.
Step 5: Position the subwoofer. Place it on the floor in a corner or against a wall initially. Run test tones and listen: some rooms produce boomy bass in corners, while others sound better mid-wall. Move it inch by inch if needed. You can always relocate it after calibration.
Step 6: Run cables. Use speaker wire rated for your runs (14 or 12 gauge works for most homes). If runs exceed 50 feet, use 10 gauge to minimize resistance. Keep cables away from electrical lines to avoid hum. Most receivers sit near the TV: use a long 3.5 mm or RCA subwoofer cable to reach the sub without kinks or tension.
Step 7: Calibrate. Connect your receiver’s microphone (or a smartphone app if your receiver supports it) and run the auto-calibration. This sets speaker distance, level, and crossover frequency. Fine-tune manually if the result doesn’t match your room or preferences, auto-calibration is a starting point, not the final word.
Choosing The Right Space and Placement
Room acoustics matter more than most people think. A perfectly tuned system in a live, reflective room sounds worse than a modest system in a treated space.
Room size: A 5.1 system excels in rooms between 150 and 300 square feet. Smaller rooms (under 120 sq ft) can work but may feel cramped or over-pressurized by the subwoofer. Larger spaces (over 400 sq ft) benefit more from a 7.1 setup. Your room doesn’t need to be a dedicated theater, a corner of a bedroom or den works fine, as long as you can position speakers without compromising your furniture layout.
Furniture and soft furnishings: Heavy drapes, carpets, sofas, and bookshelves absorb sound reflections. This is good, it prevents harsh echoes. Hard surfaces like tile, glass, and concrete walls reflect sound and create muddiness. If your room is very hard (minimalist furniture, bare walls), add soft furnishings: curtains, rugs, or acoustic panels behind the surround speakers.
Symmetry matters for surround placement: If your listening seats are in the middle of the room, place surround speakers equidistant from the listening area. If seating is off-center, aim for balance rather than perfect geometry. A slight imbalance is less noticeable than a stark “surround is too loud on the left” scenario. You’ll fine-tune volume with your receiver’s calibration mic.
Avoid common mistakes: Don’t hide surround speakers behind large objects: they need a clear path to ears. Don’t place the center channel so high that it points down steeply (dialogue will sound unnatural). Don’t tuck the subwoofer into a corner if your room already booms, you might need to experiment with placement. Many reviews of the best home theater systems emphasize that placement decisions rival speaker quality in importance. Real-world testing confirms that moving your subwoofer even 12 inches can change bass balance dramatically. Consider your room’s layout before committing to speaker positions, measure twice, install once. A practical approach: set up speakers temporarily using speaker stands or furniture, run test content, and listen for a week. Only permanently mount once you’re confident in placement. Testing different configurations costs nothing and saves you from drywall holes later.
Conclusion
A 5.1 channel home theater system delivers genuine surround sound immersion at a reasonable cost and effort level. Smart planning, choosing capable equipment, positioning speakers thoughtfully, and calibrating accurately, ensures you enjoy years of excellent movies, music, and games. Take your time with setup and don’t rush placement decisions. The reward is a dramatic step up in audio quality that transforms how you experience entertainment at home.